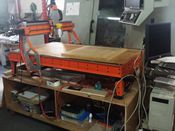
CNC Router
| CNC Router | |
|---|---|

| |
| Name | CNC Router |
| Zone | Wood Shop |
| Reservation Address | Link |
| Reservation Calendar URL | Link |
| HOWTO Reserve Time on Equipment | |
| Owner | Steve Nowicki |
| Make Model | Platform CNC (see link below) and router head |
| Part Number | |
| Date Acquired | |
| Storage Location | Wood Shop West Wall, next to Dust Collector |
| Authorization Required | Yes |
| Status | Running |
| Value |
|
| Documentation | DIY CNC Platform Kit |
| Other References | |
Contents
Intro
AKA "the orange one". Cutting Area is 30"x48"x5.5"
Rules
Only use with owner's permission and supervision. Formal training & testing procedure in development and details to come.
Instructions
Follow similar directions as the HAAS
Here are some Preliminary (unapproved) Instructions:
- When you first approach the machine, the computer and machine should be powered off, and the machine surface, gantry, and computer should be covered. If this is not the case, please inform Steve Nowicki.
- Remove the covers for the computer, machine surface and gantry. The surface cover is secured with four magnets (two on the front and two on the back of the machine) and the gantry cover is secured with a large rubber band. Place all covers neatly off to the side.
- Plug in the power switch box that is located below the computer. This supplies power to the computer, monitor, CNC, and router.
- Power on the computer by ensuring that the "Computer" and "Monitor" switches of the power switch box are in the on position, and then press the power button of the computer.
- After the computer is powered on and signed in, open "Mach3" from the desktop.
- Turn on the CNC by ensuring that the the "CNC" switch of the power box is on and that the emergency stop on the front of the machine is not engaged.
- In Mach3, press the "Reset" button located in the bottom left to reestablish a connection to the CNC. The CNC should now be able to jog in all directions.
- Load your Gcode.
- Mount your stock onto the machine surface.
- Install the proper router bit
- Establish the work coordinate system (WCS).
- Before turning on the router, make sure that the dust shroud is installed and the vacuum is turned on.
- Turn on the router using the "Router" switch on the power switch box.
- Run your Gcode.
- After you are finished using the machine, it is vital to the machine and it's future use that you return it to it's proper protected condition (computer and other equipment properly turned off, machine vacuumed for any dust, all equipment covered).
Instruction TODOs:
- Write up on how to:
- Load Gcode
- Secure Stock
- Install router bits
- Auto-zero the machine (corner finding, z-leveling)
Maintenance Info
FAQ
ToDo
- Officially approve this equipment to live in the CNC zone
- Populate this wiki page with useful information
Authorized Users and Trainers
| Trainer Name | Certified Date |
|---|---|
| Steve Nowicki | 2018/10/16 |
| Drew Jackson | 2020/12/16 |
| User Name | Authorized By | Date of Most Recent Training |
|---|---|---|
| Drew Jackson | Steve Nowicki | 2018/10/16 |
| Thad Johnson | Steve Nowicki | 2020/12/16 |
| Jim Kemp | Steve Nowicki | 2020/12/16 |
| Frank La Marca | Steve Nowicki | 2021/09/27 |
| Tim Clayson | Steve Nowicki | 2023/01/01 |
| Frank Aloia | Drew Jackson | 2023/06/19 |