Makerbot
| This page contains historical information. It is provided for reference but does not reflect current information or policy. |
This page has been removed from search engines' indexes.
| Makerbot | |
|---|---|

| |
| Name | The i3 Detroit Makerbot Page |
| Zone | Fab Lab
|
| Owner | i3Detroit |
| Make Model | Makerbot CupCake |
| Part Number | |
| Date Acquired | |
| Date Departed | NO DATE DEPARTED |
| Storage Location | Disassembled |
| Authorization Required | No |
| Status | Departed |
| Value |
|
| Documentation | MakerBot Website Cup Cake CNC Page |
| Other References | Thingiverse - a place with designs contributed by other people |
Contents
Intro
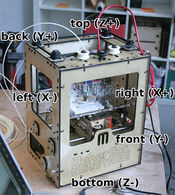
This page documents all there is to know about our MakerBot. The version we have is a Cup Cake CNC.
The MB has either an Automated Build Platform (ABP) or just a Heated Build Platform (HBP). It is currently set up with the static HBP because of warping on the ABP belt, issues with the electrical connectors, and slop in the positioning. Until those are addressed, please leave the HBP in place.
Rules
You should get a walk-through on this machine prior to using it. Our MakerBot is a standard build, but there are some options you should know about, you need to have the right software configuration, and it has some quirks. Contact Mattfor more information.
Instructions
A detailed recap of the operating instructions is beyond the scope of this page. Please get an introduction to the i3 Detroit machine, and read up on the online documentation. How to Print on the MakerBot website
Here is the list of software you will need:
- Java Runtime[1] NOTE: JRE6 is recommended, Java7 is untested. NOTE 2: Linux users, note that Oracle Java is necessary, as OpenJava doesn't work properly with RepG.
- Python 2.7.3[2] NOTE: I haven't tested with Python 3.
- ReplicatorG[3] As of 2012.07.01 verson 37 is working fine with the cupCake.
Connecting to the MakerBot (MB)
Once you've got ReplicatorG (RG) loaded and running, power up the CupCake (MB) and plug the USB cable from it into a free port on your computer. Click on Machine>Driver and choose either the Cupcake w/ Automated Build Platform or CupCake w/ Heated Build Platform. Then click Machine>Serial Port and look for the port that was assigned to the MB. Note that you may have to use the Rescan feature.
Once you've got the MB hooked up, look in the lower window and you should see that RG has recognized both the MB and the extruder and printed out the revision numbers for each.
Loading the Part
At this point you will either need a file (STL format) with something you've designed, or you can look at the built-in examples by clicking on File>Examples and picking something. Choose File>Open if you've got a file of your own.
You should see an image of the thing you designed (or the example) in the main window of RG. Just to make sure it's sitting correctly on the build platform, click Move and then click Center and Put on platform. These are on the menu to the right of the main window, NOT the menu across the top! You're eventually going to want to explore what the other things over there can do, but for now don't mess, unless you're object is bigger than the wireframe box in the main window. If that's the case, you'll need to use the Scale button on the right to shrink it down to a buildable size.
The next thing to do is to generate the GCode that is the list of instructions for the MB. Click the Generate GCode button in the lower right. In the menu that comes up, choose SF35-cupcake-HBP or SF35-cupcake-ABP. For your first builds, Try using the raft by checking that box. The raft provides a good, stable surface that will improve the quality of the output and reduce warpage. The downside is that you have to remove the raft when it's done. Click the Generate GCode button.
Watch the activity in the small lower window where you saw the MB software versions when you first connected it. You should see indications that the code generation is proceeding and then a confirmation when it's done. At this point, you're ready to start the actual build. Click the File>Save to save your GCode and changes.
Set Up and Zero the MB
Click the manual control button, that looks like 4 arrows at the top of the window. Set the extruder temperature to 220 and the build platform temperature to 110. This will pre-heat them while you set the 0 position.
Use the jog buttons on the left side to manually move the extruder head to the center of the platform, with about 1 mm gap in the vertical direction. Set this as the zero position using the button below the position indicators. When you start your build the MB assumes that the extruder is set to this zero position, so remember to check that it's zeroed before EVERY build. Note that as you're jogging the head around, you can choose how far each click will move the head. Make sure, especially in the Z direction, that you don't crash the head into the platform or go off the edge. There is a stop button in the center in case you see it's going to crash. Be ready to click it!
Once it's set, look for the temperature traces on the right to converge to the set points. Then close the manual menu.
Start the Build
Start the build by clicking the second large button across the top. There may be some delay before it moves because it will wait until the extruder head and the build platform reach the target temperature. If it takes too long, cancel and open the manual control menu. It occasionally forgets the set temperature and you'll need to enter 220 and 110 again. Then watch to see that the temperature traces start rising. Go back and restart the build.
Once it reaches the set temperature, the first thing it will do depends upon whether you are using the heated build platform or the automated (and heated) build platform. The former will move the head up, extrude some plastic, and wait just long enough for you to pull off the filament that comes out. Be careful not to scrape the head because it's coated with Teflon. The latter will move the head over, extrude some fiber, then try to wipe it off on the non-existent brush, so you'll have to quickly clean it off.
Once it's going, watch the build carefully to make sure that the filament going into the extruder head does not get hung up. Also, make sure it continues feeding the fiber - you may need to lightly adjust the pressure screw on the extruder head. In extreme cases where it won't extrude, I've had to go to the manual control and back the filament out, cut off the end, and feed it back in. You do this with the extruder controls in the upper right on the manual control menu.
If all goes well, you're build will complete correctly. The single biggest problem we continue to face with this MB is that it will randomly skip a few steps and one layer of your build will be offset (in the X-direction), spoiling the build. It's very difficult to try to restart the build, so if this happens, your build is effectively scrap. Help in resolving this issue would be really nice!
There are other, more complicated things going on that I won't go into here yet. For example, there is a way to edit out the extrude / wipe commands at the beginning of the build, but you either have to find the right commands in the GCode (yes, you can edit it), or edit the start.gcode and end.gcode files for the Skeinforge software that's embedded within the RG software.
Contact Roger S if you have questions or want a walkthrough on the MB.
Maintenance Info
2012.07.01: Makerbot is running very well on RepG-37. I'll publish my settings file soon so others can use my known good settings.
FAQ
ToDo

